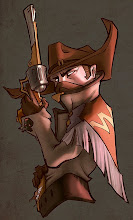
Does this blog still exist? Oh my....
God it feels good to get back to painting/drawing! Gonna post my inktober stuff next week too. YAY!
The whole values thing eludes me, so I'm gonna stay in black in white from now on, I promise. The ole sarge:
Saturday, October 3, 2015
Sunday, June 22, 2014
Porty Update 2014
YO!
I decided to put together some of my best work from the past year. Enjoy!
Copyright Riot Games, of course. Some of the concepts were improved in model and texture by my awesome teammates :D
I decided to put together some of my best work from the past year. Enjoy!
Copyright Riot Games, of course. Some of the concepts were improved in model and texture by my awesome teammates :D
In other news, I will be doing live demos and sketches at the Japan Expo in Paris next weekend. Stop by the Riot booth and say hi!
Saturday, May 17, 2014
It's all about where you go, no matter where you been
Trying my hardest here.. need to learn more planes of the face. :)
That's right, folks, TWO earholes!
Who's that Pokemon?!
Work has been insane this week. Finally have a little breathing room before plunging back into the fray. This blog is how I relax.
Working on my visual narrative skills. I keep getting kicked in the ass by the badasses here critiquing my work. It makes me dangerously inspired to get better :D
Going shot by shot is awesome because you have enough time to think about the meaning of every decision the director has made. That is, if the movie is considered a masterpiece. If it's not, you have time to think about what you could have done better.
I'll give you guys a hint: I didn't even get to the desert, which was the whole point of starting these.
Process for laying out a human figure:
Rectangle for head, rectangle shape for body.
Shoulder line.
Put in arms and legs in angular shapes.
Even the slightest shift of proportions completely changes the gesture.
Mark hands and ground feet.
Go back to face. Put in ear and hairline.
Put in jaw.
Eye sockets and nose.
Maybe mouth. Maybe eyes.
Just keep getting smaller with your rectangles and trapezoids depending on detail level.
And now for a little personal piece!
Attempting to apply some of the things I learned from recent studies. Learning lots about planes of the face, and about rendering form precisely. I feel like the fastest way to get your form to read cast-drawing-precise is to use a small brush and hatch. I'm beginning to "feel" the little undulations of the surface as I'm rendering, it's cool.
Working on my visual narrative skills. I keep getting kicked in the ass by the badasses here critiquing my work. It makes me dangerously inspired to get better :D
Going shot by shot is awesome because you have enough time to think about the meaning of every decision the director has made. That is, if the movie is considered a masterpiece. If it's not, you have time to think about what you could have done better.
I'll give you guys a hint: I didn't even get to the desert, which was the whole point of starting these.
Process for laying out a human figure:
Rectangle for head, rectangle shape for body.
Shoulder line.
Put in arms and legs in angular shapes.
Even the slightest shift of proportions completely changes the gesture.
Mark hands and ground feet.
Go back to face. Put in ear and hairline.
Put in jaw.
Eye sockets and nose.
Maybe mouth. Maybe eyes.
Just keep getting smaller with your rectangles and trapezoids depending on detail level.
And now for a little personal piece!
Attempting to apply some of the things I learned from recent studies. Learning lots about planes of the face, and about rendering form precisely. I feel like the fastest way to get your form to read cast-drawing-precise is to use a small brush and hatch. I'm beginning to "feel" the little undulations of the surface as I'm rendering, it's cool.
Monday, May 12, 2014
Oh Shit
I forgot to upload all of these! Turns out I have been drawing, you guys!
Probably not chronological..
Main points: Smudge tool solves everything. Think of your "paint" like clay. If this drawing were a sculpture, which way would the planes be facing?
Form rendering is really about consistency. Under strong direct light, all planes facing same direction should have same value.
Process: Block out with opaque values. Smudge over transitions. Go in with tiny brush and crosshatch like you would with a pencil.
Last one inspired by Pan's work. I learned a lot from seeing his studies. Mostly that you have to put in the time with a tiny brush if you want the form to be precise. There are no shortcuts.
Probably not chronological..
Main points: Smudge tool solves everything. Think of your "paint" like clay. If this drawing were a sculpture, which way would the planes be facing?
Form rendering is really about consistency. Under strong direct light, all planes facing same direction should have same value.
Process: Block out with opaque values. Smudge over transitions. Go in with tiny brush and crosshatch like you would with a pencil.
Last one inspired by Pan's work. I learned a lot from seeing his studies. Mostly that you have to put in the time with a tiny brush if you want the form to be precise. There are no shortcuts.
This side of Town
I did some sketches earlier this year. It's time they saw the light of day..
Oh.. Maybe that one shouldn't have.
Monday, January 6, 2014
Saving Face
It's hard, but I'm learning a lot.
Process is now actually working with as few values as possible. Don't start blending until your form reads!! And figure out a way to block in as much information as possible without picking new colour, switching brushes or lifting your stylus off the tablet.
SO,
1. Pick out the plane with the highest value in the "section" you're working on
2. Measure its angle of incidence to the light
3. Calculate the right value that is consistent with the rest of the "sections"
4. Blend it into the other areas controlling the speed and direction of gradients
>.<
Monday, December 23, 2013
Walter White or Vladimir Lenin
The pain of brushwork that has been haunting me since I started drawing... It all can be solved with painting opaquely!! (and then smudging) Even though Trevor's been telling me to do it for about a year now, it only now dawned on me that the second biggest obstacle between you and a quick render is COLOUR PICKING! (The first one is putting the right mark in the right spot)
And it takes a while to get that colour right, so most people try to blend it on the canvas, which actually takes wayyyy longer.
For most materials you only need to pick 3 or 4 different colours, the rest is blending. So invest that time to pick the right ones upfront!!!
Trying Borislav's brush technique to improve form rendering and facial structure. Learned a lot. Still more to go.
Sunday, July 28, 2013
Cot!
First maester study in a looooooong time.. I failed at the values, which I realized 2 hours into it.
Needless to say, learned a lot. Should probably stick to grayscale for now..
Remember when switching local value, that your values for lights and shadows will switch also, and grow proportionally to the amount of local value shift.
Needless to say, learned a lot. Should probably stick to grayscale for now..
Remember when switching local value, that your values for lights and shadows will switch also, and grow proportionally to the amount of local value shift.
Sunday, June 30, 2013
Yin and Yang qi
Slowly foraying into materials and colour rendering. Decided to start by copying this master. And doing a little doodle to see what I learned.
The OG
Start with rough grayscale, low contrast. Clipping mask --> add your hues to the shadows. Work mostly in the low saturated tones and limit it to 3-4 main hues for the shadows. Then find your saturated spots and put em in. Then find your highest values and put them in. Continue until done.
Always unify and desaturate all your colours because thats how photoshop works best. You can paint saturation and brighten up the value later.
Shapes are usually highlighted by occlusion shadow around them.
Keep your colours as simple and unified as possible, because anything you pick will blend differently with the thing underneath it. Also, if you keep your hues subtle, you won't need as much to describe variation. Bright colours require more brushstrokes.
Also, you can reuse the hues on your canvas for different materials..... Interesting.
Split it up by planes. Any form you put down, find the terminator and rough it in (with gradients if you can).
Only put down form strokes when you need to. When you can leave it as is, leave it as is. If you don't "feel" the form, then add more.
Imagine that you're actually looking at it. In real life. Think about where the rays are going, what they're bouncing off of.
The OG
Start with rough grayscale, low contrast. Clipping mask --> add your hues to the shadows. Work mostly in the low saturated tones and limit it to 3-4 main hues for the shadows. Then find your saturated spots and put em in. Then find your highest values and put them in. Continue until done.
Always unify and desaturate all your colours because thats how photoshop works best. You can paint saturation and brighten up the value later.
Shapes are usually highlighted by occlusion shadow around them.
Keep your colours as simple and unified as possible, because anything you pick will blend differently with the thing underneath it. Also, if you keep your hues subtle, you won't need as much to describe variation. Bright colours require more brushstrokes.
Also, you can reuse the hues on your canvas for different materials..... Interesting.
Split it up by planes. Any form you put down, find the terminator and rough it in (with gradients if you can).
Only put down form strokes when you need to. When you can leave it as is, leave it as is. If you don't "feel" the form, then add more.
Imagine that you're actually looking at it. In real life. Think about where the rays are going, what they're bouncing off of.
Friday, June 14, 2013
Manatee of Steel
You need to make some important calculations to show form. First, find the planes of the brightest brights. Next, find the planes of the terminator. Next, find the halfway point between the plane of the brightest bright and the plane that faces the camera. Once those planes are there, just measure the speed at which transitions happen between them.
Render form shape by shape. Get the big mass in first, then medium, then small. Start with a flat value (preferably the darkest), then add the brightest bright, then highlight if needed. Oh yeah, don't forget the cast shadow, too! Add ambient occlusion and reflected light, and there you have it!
Scott Robertson says: "form change equals value change" so choose which forms you will render wisely.
Render form shape by shape. Get the big mass in first, then medium, then small. Start with a flat value (preferably the darkest), then add the brightest bright, then highlight if needed. Oh yeah, don't forget the cast shadow, too! Add ambient occlusion and reflected light, and there you have it!
Scott Robertson says: "form change equals value change" so choose which forms you will render wisely.
Tuesday, June 11, 2013
Thursday, June 6, 2013
And I think to myself
that I should get better at form.
New way of painting. Start with ambient occlusion, because a ton of your values and shadows are gonna come from that anyway.
There are two kinds of gradients, one that moves toward you and one that moves away from you. You need a separate brush for both.
Be careful when it comes to subtle value differences. As soon as you enter that territory, your mistakes will cost a lot of time to fix. Make sure your big shapes and values are placed correctly before that happens!!
New way of painting. Start with ambient occlusion, because a ton of your values and shadows are gonna come from that anyway.
Sculpt by Bruno Camara
There are two kinds of gradients, one that moves toward you and one that moves away from you. You need a separate brush for both.
Be careful when it comes to subtle value differences. As soon as you enter that territory, your mistakes will cost a lot of time to fix. Make sure your big shapes and values are placed correctly before that happens!!
Tuesday, June 4, 2013
Allofher Chippers
Stylization class this morning. Courtesy of my friend o-town chipster.
Learned a lot. Pushed limits. Now better. More of this.
Saturday, June 1, 2013
Getting Back
So I went to Canada. Time to make up for lost time.
Make a dot of right plane, then blend it into the rest. Maybe it's too early to learn form from faces? hmm...
Start with the darks.
Work with 2 values for as long as possible. Base and dark. Then work in the brighties.
Saturday, May 25, 2013
Generic Demon-San
So I'm back from my vacay. Still learning form. These were done before, at the suggestion of my friend Avery. They helped out a ton, but I have a lot to learn.
Make sure you err on the side of the dark.
Keep it in midtones, then put in the darkest darks, then put in lightest lights.
There are thousands of different ways to render form. It doesn't
need to be 100% accurate all the time. Just make sure it looks cool.
Keep things loose until the very end. Always.
Its about corners and highlights. Those are the hardest and show the most form.
Render the major plane changes at a time.
Sculpt the form as quickly as possible. Leave the planes simple, then go in with the divets and veins.
Saturday, May 11, 2013
My kinda gal
So pretty...
Don't edit form, just get better at simplifying. Average your transition values, then add your high-value points. It's a lot easier than editing low-value points over and over. That's how the masters did it. Building up.
There are two ways to render - airbrushy, and hard edges. Know when to use both. Make conscious decisions where you want to smudge and where you want to keep your planes sharp, because edge sharpness affects values as well. Choose your big gradients the same way you choose your big edges.
Break your image into less than 10 swatches. Then mix in and out of them. Oil painters have to mix everything by hand, so they simplify the palette as much as possible. Trouble is, in digital colours don't mix so smoothly....hmmm..
Photoshop is a big distraction, because it has so many tools and options. Paint as efficiently as possible. Don't get lost in editing. Do it all in one stroke.
Keep your painting mostly dark, then add one area (no more than a sixth of the painting) where all the bright values are. eg. Brom.
Thanks for your advice, Josh. I'm still really bad at it, but hopefully it'll help. :D
Friday, May 10, 2013
Friday, May 3, 2013
Selfy
Values are relative. Don't try to measure values when you're trying to sculpt form. After you rough in your planes, just control and refine gradients until it looks correct.
The more a plane faces the light, the less value change you need to "bend" it.
Probably gonna get some animal skulls to still life it up.
Ugh.. could not get that cheek/forehead to look right for the life of me. I'm so sorry.
The more a plane faces the light, the less value change you need to "bend" it.
Probably gonna get some animal skulls to still life it up.
Ugh.. could not get that cheek/forehead to look right for the life of me. I'm so sorry.
Tuesday, April 30, 2013
More More More...
So I was doing these today:
And then holy shit, I just realized I was doing everything wrong. I was focusing more on the drawing rather than the planes and form, which is actually what i'm trying to learn.
Here's how you do it:
Identify plane most important planes---> Put the right flat value on them ---> smear it into other planes
And then:
Learning!
And then holy shit, I just realized I was doing everything wrong. I was focusing more on the drawing rather than the planes and form, which is actually what i'm trying to learn.
Here's how you do it:
Identify plane most important planes---> Put the right flat value on them ---> smear it into other planes
And then:
Learning!
Subscribe to:
Posts (Atom)